Friday, February 27, 2015

Laser cutter fun

Tablet weaving cards from the laser cutter Rigid heckle from laser cutter

A while back I got to spend some quality time with a laser cutter and I had a lot of fun.  I forgot to take pictures of all the stuff I made, but I found these in my crafty piles recently.  The first picture is some tablet weaving cards that were cut from thin stock.  They measure 2.5 inches square (or about 64 mm square).  The second picture is a rigid heddle that I made.  It measures 5.25 inches (133 mm) wide and 6 inches (152 cm) tall.  The gaps and heddles are about 1/8 inch (3 mm) each.

Monday, February 23, 2015

Byzantine Silk Swatch

Fill for the leaves are done Starting the outline stitching

I've been stitching along and making progress.  The leaves finished up nicely and although the red isn't as full as I'd like on the stitching, the shiny silk lends some forgiveness.  I used a fat pearl cotton to padd the border stitches and started in on the white.

Satin stitch border is finished

And I finished out the border!  The pearl cotton didn't provide as much loft for the border as I had hoped.  I think that next time I will need a fatter stitch to give a bit more dimensionality.  Just back stitching seemed so fat next to the leaves so I was afraid that a stem or chain stitch would add too much bulk, but I could have added more.  I like the coverage on the border though and the contrasting stitch directions is a nice design element.

Outlining with Japan gold

Here is the start of the shiny gold!  It's finally coming together and starting to look pretty spiffy.  I took an angled photo so show some of the depth that the silk shine adds to the piece.   I've got a Kreinik Japan #7 here for the leaf outline and it has a very complementary shine.  I fiddled with a number of gold options, but the Japan was really what I needed for all those curves and tiny points.  I probably could have gone a teensy bit smaller and used a Japan #5 just because the design is so detailed, but I didn't have any #5 on hand and I am trying to pull supplies from my hoard.  Although the #5 would have been a bit more delicate, the #7 works just fine and really isn't too bulky for the outline.

Friday, February 20, 2015

New Handout!

I've posted a new PDF on my Handout's page!  Check out "Sewing a Perfect Rider's Split for a Surcoat."  With the surcoat sewing parties, I have received a lot of questions on how to get those surcoat splits to lie flat and survive combat.  I have finally gotten around to finishing up the "how-to" for everybody.  Clicking on the icon opens the PDF on Google Drive, where you can read and download it.  Enjoy!


The Prodigal Surcoat is Clean!

Repaired surcoat frontRepaired surcoat back

After numerous repairs and lots of cleaning, the prodigal surcoat is looking mighty fine!  I returned it this Tuesday to our War Company commander, who promptly took it back into action for melee night.  I totally forgot to take a picture of it in action.  I got some "oooohs" and "ahhhs" from folks who had seen the poor thing in it's original state.  I am quite pleased with this project - an easy win in terms of getting surcoats of the project rack and a nice affirmation for quality control :)

Monday, February 16, 2015

Repairing the Prodigal Surcoat

Sad stripes
 My first task was applique repair. Here is a good example of a stripe that needed help. The linen has disintegrated in bits and the applique is peeling up. Some of the stitching has pulled loose. It is a very sad little halberd stripe.

Stitched up stripes
 First, I ironed down the stripes and even sneaked a little bit of Wonder Under in bits that were completely pulled off. I stitched the stripe back down on the edges and added some darning stitches to keep ruffled bits tacked down. After lots of darning stitches and some more ironing, it's starting to look much better. There are still some little naked white spots where the black fabric is gone.

Finished stripes

Here is where I must confess that I pulled out the Sharpie laundry marker in black and just fixed the problem with a marker. It looks much better now though.  I went through and fixed all the other applique bits and most of them were much easier that this stripe.  There were a few spots where yellow fabric was gone so I had to do some extra darning and extend the applique stitch line into the halberds.  

Once the applique was all fixed, I then started patching holes.  I still have fabric left over that matches the original, so I had plenty for tiny patch pieces.  There were a lot of holes that needed mending.  After finishing all the holes that were big enough to require patches, I put the surcoat in for a good soak for some stain removal.

  Soaking out the stains

This is the surcoat after soaking for 6 hours in oxyclean.  The water is really, really gross.  I threw in a dye catcher to try to get some of the dinge out and hopefully pick up some of the armor grunge and leather dye.  The dye catcher worked surprisingly well and is the dark gray blob at the top of the bucket.  That dark gray absorbed a lot of color floating around in the dirty water.

Saturday, February 14, 2015

The Prodigal Surcoat

On the morning of the first great sewing day, I was starting to get a little nervous.  We were making a lot of surcoats for a lot of people and I was beginning to sweat the details.  But then, a little SCA magic happened....

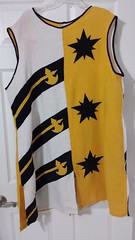
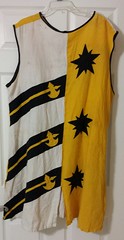
My first batch of surcoats was made with my friends Rachel and Blaise.  I wore my surcoat at that Bordermarch Autumn Melees (BAM) and Gulf Wars.  Here is a picture of it all nice and relatively unscathed.

IMG_0410

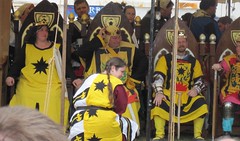
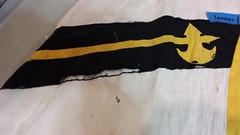
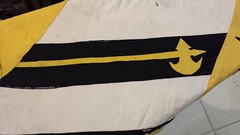
That's me in the court of King Owen and Queen Genevria at Gulf Wars.  Anyway, I wasn't going to BAM the next year, so I loaned out my surcoat to a friend.  As I missed more and more melee events, I kept getting asked by various people to borrow the surcoat and it got passed around.  At some point, we lost track of who had it and I had written it off to the sands of antiquity.  So, the morning of sewing day, Ionnes walks through the door and asks if he could add surcoat repair to the queue.  He has this scruffy looking surcoat that needs repair (front on left, back on right).

Front of surcoat before repairBack of surcoat before repair

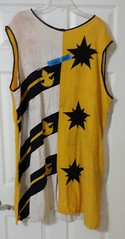
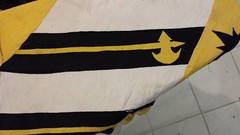
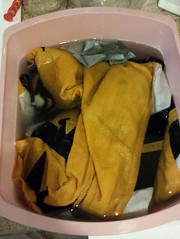
The first thing several people say is "wash it first," but he had!  We dampened it and ran it through the drier.  We ironed it without mercy.  The pictures above show our improved results.  It's still pretty scruffy.

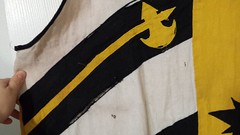
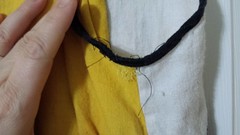
 The stripes are falling off and a bit shredded.  There are tiny wear and tear holes scattered all over.  These little holes are pretty normal and familiar for the chivalric combat folks.  The neck and arms holes are in need of some help.

Wear and tearWear and tearEdge wearEdge wear

The construction of this surcoat is looking pretty familiar, so I look inside and there is a little mark in the front.  This is my prodigal surcoat - returned home!  Some laughing and a bit of discussion gave it some history.  It's attended five years of melee events since it left me!

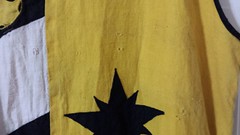
So now this scruffy coat has some perspective and it is in pretty good shape for five years of melees.  The stitching has held up surprisingly well.  The star applique is in very good shape and needs minimal maintenance.  The stripes need serious repair.  They are not just peeling off at the edges, the linen is disintegrated in some bits.  The tiny little holes will need darning where they are getting big.

The most surprising thing I've learned is that "decorative" bias tape on the neck and arm holes is actually reinforcing those seams - and in some places is holding it together where the fabric has shredded.  Now I know why we use that approach.  We made our own linen bias tape and it still looks good and has worn really well.  I think that it was worth the effort and probably extended the life of this garmet for at least a couple of years.

So, now I can say with some confidence that this little workshop makes some quality fighting gear :)

Monday, February 9, 2015

New thread!


I really wasn't going to start anymore new projects. I've buckled down and focused on knocking things out of my queue with the goals of gulf wars preparations.  But appliqueing a gajillion halberds takes a half a gajillion spools of thread, so I just had to go to Joanne's.  And while I was on task in the thread aisle, this little display lured me in and caught me.

Thread display Thread display, more colors

How could I pass up filament silk at a good price?  I could not.  So, I bought two spools to play with, one in red and one in white.  My intentions were a quick test of the thread so that I could decide if I really liked it.  Once I had the thread it was really soft and shiny and "oh so" pretty!   Also rumbling around in my mind was the desire to make something for a friend.  These two motivations were all I needed as an excuse to have fun in the design phase.  I found something I liked in one of my favorite design books: "Treasury of Byzantine Ornament" by Arne Dehli (published by Dover).

Design pattern Template

Above are a snapshot of the original and my template on tissue paper.


Stitching the pattern outline The stitched outline

Transferring patterns to black fabric is always a challenge.  I am ever the optimist - feeling that one day I will find a transfer method that make me happy.  The truth is that the process is fiddly no matter what the approach.  This time I chose to pre-stitch the outline from a tissue paper template.  This method is popular with a lot of fine embroidery enthusiasts, especially on dark fabrics or fabrics that won't or shouldn't take a pen or chalk or other potentially messy options.

I shouldn't have used the silk on this step.  It was so smooth that the template really didn't want to come off and the stitches got pulled around too much.  After a bit of coaxing and pulling some of the stitches from the back, it finally looked good again.


Stitching progress

And here is the first bit of stitching.  I'm doing laid work in the red with gold highlights for the couching.  The gold approximately matches the detail lines from the original drawing.  The filament silk is very shiny and as fiddly as filament silk is expected to be, but not really more.  I'm planning on a slighly thicker gold for outlines and the border in white.

I hate progress pictures at this point.  The silk is still a bit wonky.  The couching is freshly done.  The outline isn't in yet.  The whole thing is just "off."  I share them with you, my dear readers, because those who truly inspired me do the same.  Pretty things don't start pretty.  There is a magic point along the way where it all blends together and starts to look nice.  Sometimes it doesn't actually blend and those projects are educational as well.  I don't think I would have been brave enough to try some of the techniques that I've seen in project blogs if people didn't share these "in between" progress pictures.  In that spirit, here are mine.  I hope this one works.

(With that little aside, the red is lucious and the gold is sparkly, and distances are most forgiving - so I am optimistic)

Sunday, February 8, 2015

Apron dress roundels


Finished roundels

I've finished the stitching on my apron dress roundels!  Hooray!  There are two roundels, one on each side gore.  The base black is silk and the stitching is a pearl cotton in a combination of stem stitch and chain stitch.  Here is a picture of them flat for better detail.

Finished roundels