Saturday, September 1, 2012

Cheap goldwork?

I've been itching to try some goldwork embroidery for quite some time, but can't bring myself to spend that much money on supplies. I am a huge fan of Good supplies and am happy to spend my money at places like Hedgehog Handworks for quality stuff. However, most of the goldwork embroidery market is ecclesiastical embroidery, where they have a budget to allocate for real gold. I'm more interested in playing around with stuff and will likely making some stuff for SCA that will go camping. In this case, it doesn't *have* to be real gold, just look nice. Thus began my quest to find cheaper alternatives.

Fortunately, I received a lovely goldwork sample set from Hedgehog for my birthday and I have the real deal to compare with. I have picked up a couple of options and going to give them a try. There are three important points to this experiment. First they need to be pretty good approximations for the real deal. I want to re-create a look, so the closer they are to the original, the better. Secondly, they need to play well with fibers. I need to be able to stitch them up without them falling apart, shredding things, or being too finicky to work with. Finally, these substitutions need to wear well. If the metal on them goes a nasty color after a week of use, then it's not good.

I begin my tests with orders from two places: Here is the first stitching test result: goldwork-test 
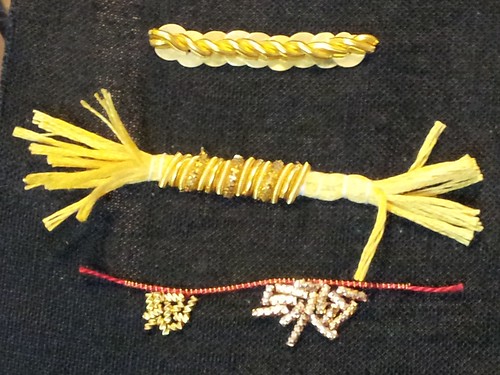
I used my book "A~Z of Goldwork with Silk Embroidery" for instructions and did three rows of test swatches. Row 1 is from page 102. Row 2 is from page 109. Row 3 is some chip work with two different kinds of gold check. The top border of the chip work is a stretched coil wire with red embroidery thread strung through the core (couched down with red thread) to mimic some of the nicer pearl purl effects.

Overall, I'm happy with the test run. The materials aren't as supple as the nice goldwork supplies, but they weren't difficult to work with (beyond the normal challenges of goldwork). I will have to work on my technique, since you can definitely see some unevenness on the row 2 work. The chip work on row 3 would normally be done over yellow felt padding, which makes for a more even sparkly effect. I definitely like the check on the left better than the check on the right. That's not too surprising since the check on the right is super cheap and even has crossed the line into looking cheap. If you needed lots of sparkle, minimal definition, and to cover a lot of ground cheaply, then the stuff on the right would be ok.

Before you go out and spend any money, keep in mind that I have no idea how this will wear. My plan is to do a couple of test swatches and see how they do. One great suggestion I got at Laurel's Prize was to leave a test swatch outside for a week for weathering and try another swatch just sitting in water. If the first test swatch survives my living room, I think it gets at least a few points for durability. As always, there are more detail photos on my Flickr feed, including pictures of the thread packages used in each sample.

Monday, August 20, 2012

Starting an apron dress

dress I've started work on an viking apron dress! I finished sewing it last week and had some time this weekend to get started on the embellishments. The sewing went well and all more gores are pretty and lay flat, so I was very pleased. It seems that completing a dress is only the first step, since there is lots of decoration to do. I started work on the embroidery, since that should go fairly quickly.

I follow a lot of blogs of people I don't know who do nifty things, and I have been particularly inspired by Ari's embroidery. I have a box of worn out silk shirts that I use for scrap on projects and wanted to use it for applique. I didn't want to use wonder under for the applique though, since it would make the silk too stiff and weird. So I took a leap of faith and tried Ari's techniques. I think most of her stuff is wool, so I may regret using fiddly silk, but hey - it's "free" stash fabric, so I may as well give it a try.

First step is getting the fabrics sewn together and the pattern transferred. I traced the pattern on some tissue paper and then put the dress + silk + tissue paper in an embroidery hoop on the sewing machine. The hoop kept the silk from slinking around and gave me some maneuvering control. Spirals on a completed dress on a straight stitch is probably the path to madness, so I've got an embroidery/quilter's foot on the machine to do the work free hand. Below is a picture of the set up. It worked pretty well and my only complaint was that the hoop should have been a bit bigger for better maneuvering (but there's a trade off for fabric tension with that slinky silk). My 4-year old was fascinated by the process, so I got some "helping", which resulted in some wiggly lines, but that is fixed later. machine Here is the result off the machine. Silk is sewn down and pattern sewn in. Don't worry, it gets prettier with more stuff on it. work1 Trimmed away the excess fabric and loaded it up into a hoop. Now we are ready for embroidery time! work2 My first concern was anchoring down the edges before the silk totally shredded and getting the edge decoration done. I really liked Ari's anchored chain stitch approach for strength + decoration, so I gave it a shot. It took a few stitches to get the rhythm right, but I like the way it turned out and it seems to be holding up. In my zeal to anchor the silk firmly, I think that I used stitches that were just too small for the anchored stitched. I probably should have made them twice as long, but I was so worried about a strong anchor, shredding silk, and edge coverage that I was perhaps a bit too enthusiastic. There are a few little silk shreds poking through, but not as bad as I had worried. Of course the whole silk background may disintegrate after washing, but I will still have some nice surface embroidery, and that's how experiments go. outline Next is filling in some of the pattern. I worked the spirals in stem stitch and the inner circle in chain stitch. I'm still working on my stem stitch technique, but it is improving and I think that it will hold up. As I'm stitching, I am also pulling out any stray wiggles from the sewing machine thread. This keeps things looking tidy and keeps too much fuzz. work3 So far, I really like it. The embroidery over silk lends an almost quilted quality that gives it some depth and shine. It's actually nicer than I expected. Next up is the gray fill for the outer and inner circle designs.

Thursday, August 2, 2012

More rose progress

I've finished most of the stitching for the rose! Hooray! I'm very pleased with how it's turning out :) rose2

My current obstacle is that I forgot to buy yellow wool for the center. I didn't even realize it until I finished the outline and was at the "what next"thought. Oh well, I will have to make a trip to the thread store. It's not really a problem if it gives me an excuse to go to the thread store.

One medieval aesthetic that has been a bit hard for me to embrace is outlining in festive colors. My natural instinct is to just always outline in black. I have seen so much beautiful embroidery work with contrasting and festively colored outlines, that I decided to grow as a person - I used white for the outline. I really like the results, it adds to the harmony of the piece. For perspective here is the rose stitched, just before the outline is added. You can see a little bit of the black drawing through, which gives you and idea of how a black outline would have looked - I like the white much better. rose1

Sunday, July 29, 2012

Wool roses!

rose3 I've had this project sketched out for a while and have finally gotten started on it - wool roses! Racaire has been posting beautiful wool work on her blog for a while and it has inspired me to give it a try. It's a definite shift from all that silk that I like to play with.

I used the pattern from Mary Corbet's blog for her silk Tudor rose project. One day I will try the actual goldwork rose from her blog, but for now I'm just using the drawing.

So, this is my progress thus far. I've finished the fill stitches on the rose. I have just started the outline stitches, but didn't get enough work done on that to make an interesting progress picture. I am slowly getting a feel for the wool and am getting to really like it. I don't know why, but I had a mental image of wool as unruly and messy, but it is starting to look really nice. It even has a soft, fuzzy shine to it that is very nice.

Thursday, July 26, 2012

Floche doodles

I bought some DMC cotton floche on a trip to the embroidery store and have been meaning to give it a test drive for a while. It is so smooth and soft, and such a nice fiber that I couldn't wait any longer. I pulled a motif from a handy Dover book, "Early Medieval Designs from Britain for Artists and Craftspeople" and started doodling with split stitch. It took me a few rounds to get a good feel for working the fiber, but I really love it. The stitches really work themselves nicely together for a pretty flow with stitch direction. The floche is a small thread though, so I need good lighting to do the split stitch. It's fairly tedious, but it's the kind of tedious that I frequently find relaxing. I took a quick picture of stitch progress on the frame along with the floche skeins. doodles

Monday, July 16, 2012

Largesse for Pennsic Finished!

Ta-da! Finished! progress5 There are more progress pics on my Flickr stream, but since I was too lazy to blog them in progress - I will spare you. I put the penny on top for scale, since it's a fairly large pouch. Final materials list:
  • wool - gray pouch, blue roundel
  • white linen - white crescents and pouch lining
  • Kreinik Jap 5 silver thread for couching and tassel tops
  • Gutterman silk white sewing thread
  • a lace weight white wool yarn for drawstring and tassels

Monday, July 9, 2012

Largesse for Penssic

I thought I'd post some of the progress pics on the little project I'm doing for our gift basket at Pennsic. I've been meaning to try some needle-turn applique, so this is my test project. The background is some blue wool I picked up at Gulf Wars and the crescents are a nice dense weave linen. I used the linen both as the applique and the foundation, since I didn't have any thin white wool. Below is a progress pic of the applique. progress-b The linen foundation gave more loft than I thought it would, so the crescents have a nice depth. After the applique was finished, I started with the outlining. progress-a The outlining is done in Kreinik Jap 5, couched with silk thread. I like the way they are turning out, though the applique acquired some skew. I starched the foundation linen, but alas, it was a crescent with lots of bias edges, so skew was probably inevitable no matter how well I tacked it down before the applique - lesson learned. The outlining smooths things out quite a bit and adds some forgiveness to the process. The camera doesn't really capture the wool / linen / silver contrast very well, but I am pleased with the look. More progress soon, since I'm on a deadline.

Thursday, July 5, 2012

Dark blue pouch for raffle

Bryn Gwlad is doing a raffle next week to help raise funds for the Ansteorra Gulf Wars site. I finally finished the little pouch that I was making to raffle off. The outside is dark blue linen and the lining is a light blue linen. The stitching, tassels, and drawstring are done in white cotton floche (DMC). pouch1 Here you can see a better look at the seam treatments. I used a technique that shows the lining as decoration. pouch2

Tuesday, May 29, 2012

Reliquery box

Out of the weekend of general craftiness at Casa de Clermont, a plot was hatched by my friends to build this box. I've started work and charted and stitched a sample for the first pattern 20120529_113202 I decided to get even closer to period practice and stitched this with a flat silk, Soie Oval. I have to say not only is the result very close to close up shots of period pieces, but its gorgeous! For comparison, here is a picture in the same light of sample in similar colors in a spun silk (Rainbow Gallery Splendor) 20120529_113218 And for fun, here is a nice close up of a period piece from the same time and place: We've started chatting about other construction details and I'm very excited about this project. I will post updated pictures and samples as we make progress. I've got 4 patterns charted so far and I think we will start work on the panels as soon as we order the silk.

Friday, May 25, 2012

More pictures :)

I have finally uploaded some more pictures to Flickr of my recent activities. Mostly I've been working on improving my current armor and making a long term armor plan, so they are pictures of our local armor night. I even managed to get a few good shots of the forge in action. The forge work moves pretty fast, so you take as many pictures as you can and hope that one catches a good moment and isn't blurry. I'll post some more pictures of general progress soon and embroidery updates as well.