Showing posts with label stitching. Show all posts

Monday, February 16, 2015

Repairing the Prodigal Surcoat

Sad stripes
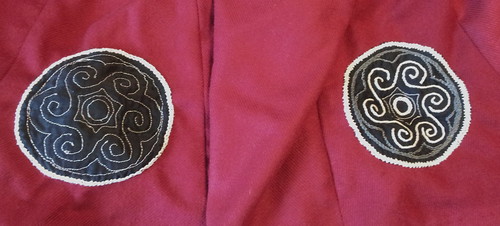
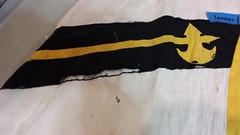
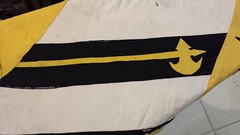
 My first task was applique repair. Here is a good example of a stripe that needed help. The linen has disintegrated in bits and the applique is peeling up. Some of the stitching has pulled loose. It is a very sad little halberd stripe.

Stitched up stripes
 First, I ironed down the stripes and even sneaked a little bit of Wonder Under in bits that were completely pulled off. I stitched the stripe back down on the edges and added some darning stitches to keep ruffled bits tacked down. After lots of darning stitches and some more ironing, it's starting to look much better. There are still some little naked white spots where the black fabric is gone.

Finished stripes

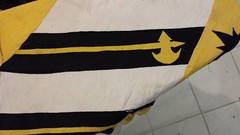
Here is where I must confess that I pulled out the Sharpie laundry marker in black and just fixed the problem with a marker. It looks much better now though.  I went through and fixed all the other applique bits and most of them were much easier that this stripe.  There were a few spots where yellow fabric was gone so I had to do some extra darning and extend the applique stitch line into the halberds.  

Once the applique was all fixed, I then started patching holes.  I still have fabric left over that matches the original, so I had plenty for tiny patch pieces.  There were a lot of holes that needed mending.  After finishing all the holes that were big enough to require patches, I put the surcoat in for a good soak for some stain removal.

  Soaking out the stains

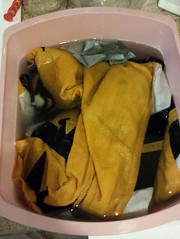
This is the surcoat after soaking for 6 hours in oxyclean.  The water is really, really gross.  I threw in a dye catcher to try to get some of the dinge out and hopefully pick up some of the armor grunge and leather dye.  The dye catcher worked surprisingly well and is the dark gray blob at the top of the bucket.  That dark gray absorbed a lot of color floating around in the dirty water.

Sunday, May 5, 2013

Brown velveteen pouch

I'm playing around with some different purse patterns and am currently working on this one: http://wychwood.wikidot.com/kit-pouches . pouch-01 The first thing that is obvious about this pattern is that there are a lot of eyelets! Once I got the pieces sewn together and everything marked, I began to wonder if I had the fortitude for that many eyelets. However, the journey of a thousand eyelets starts with a single stitch. pouch-04 I couldn't believe that I managed to get all those eyelets done! At this point I was really hoping that this pattern worked and regretting not doing a mock-up like I usually do.

pouch-05 pouch-06 I was impatient so I used some shoelaces to string it together and make sure that the gathering worked correctly. It works! Hooray! It's kind of hard to see on this picture but the gathers lay nearly perfect with a graceful curve into a nice round bottom. The next step will be to cut and sew the top flap, which will be attached at the little tab sticking up. Also, I need to make some pretty drawstrings to replace those shoelaces.

Thursday, April 4, 2013

Apron dress progress

I went to fiber arts guild last night and have made some progress on stitching the roundels on my apron dress. A while back I sewed down the second roundel (left) and stitched the edges for it. Last night I worked on the first roundel (right). I've finished the white stitching and am working on the gray fill. roundels-progress

Friday, August 12, 2011

Oak Leaf Handkerchief

oak leaf handkerchief

This was my contribution for Ansteorr'a Pennsic largess (for Queen Dagmaer of An Tir). The design is loosely taken from her heraldry - green oak leaf and blue border. This was a chance to practice my teeny tiny hem, which I think is getting smaller and more precise. It was my first try at a handkerchief and I'm pleased at how it turned out. The handkerchief is a really light weight linen from fabrics-store.com, which is really light and soft.

I did the hem in Gutternman silk sewing thread and the embroidery was done in a single thread of the Rainbow Gallery Splendor (which is a 12-ply). The tiny chain stitch was kind of a pain, but the end result was really nice. A single thread of the Splendor is a little fuzzier than I probably would have preferred originally (it was on hand) but the end result was a chain stitch that kind of melts into itself smoothly, so I think it turned out to be a good choice. I declare this a handkerchief success and move boldly forward with more handkerchief plans.

Below is a zoom of my teeny tiny hem with coins for scale. There is a US penny, a Euro one cent, and just for fun a Nederlandish guidler. That should cover most of my readership I think :) I was so happy with my earlier tiny hem that I really finally felt like I might be able to make some nicer things out of delicate linen. With a little practice, I think that the stitch turns out really nicely. I am perhaps a little smug to officially add a new skill to my arsenal.

oak leaf handkerchief

Thursday, January 20, 2011

General Update

Greetings intrepid followers! I had all intentions of making a fabulous post, complete with pretty pictures, but I seem to have left my camera in Rachel's car. So sorry. Instead, here's a more general state of the stitchery:

  • Queen's gloves - I was asked to make the Queen's gloves this reign(!) and that is largely what has been occupying my time. More recently, I was also asked to do the King's gloves as well(!), so I will be busy for a couple of months. Both are being done in the German brick stitch with gold outlining. I'm pleased with the progress so far, and there will be pictures to come...
  • Rachel's tunic - Rachel's tunic is almost finished! Hopefully I will finish it sometime soon so that she can actually wear it to an event :)
  • St. Martin's Panel - The St. Martin's panel has taken back seat to the recent flurry of activity, so I'm afraid it is getting delayed a year for Kingdom A&S. I had good momentum this Fall, but November was kind of a crazy month and then the holidays really side tracked me. The extra time does mean that I won't be rushed on anything, which is really nice.

Also, I finally got a cheap little lap stand for my scroll frame and I must say that I *love* it. It makes stitching feel much less like a juggling act. The only downside is that now I'm eye-balling all kinds of expensive stands now. *laugh*

Monday, August 23, 2010

Panel progress

Some more stitching progress on the panel. I'm hoping to get a nice chunk of it done before Laurel's Prize Tourney this weekend. I'll be taking the panel and a pile of my embroidery, as well as the pattern swatches that I've done.

Stitching progress

Wednesday, August 18, 2010

Panel progress

Here is the initial progress on stitching my panel. I'm really liking how vibrant the colors are, especially in contrast to the tan linen. I started stitching in a corner and am moving, but I think next time I will start from the center out. I'm afraid that I'm going to abuse the outer stitching while trying to get the inside stuff done. Fortunately I have three other corners free so I think I can still get the center without messing up the already stitched corner.

stitching progress

Sunday, August 15, 2010

Source and sketch for St. Martin's panel

Ready to go!

I've actually started my panel. I've got the frame dressed and the pattern traced, so now I just need to get started stitching. I've included a picture of the original from Bildindex below.

Tuesday, August 3, 2010

Tunic trim progress


tunic-progress
Originally uploaded by helene83
I've finished a little less that a skein of thread and the back panel is almost done. After I finish this part, I need to trace the design on the rest of the tunic trim. Hooray for progress!

Friday, July 30, 2010

Stitching trim


trim-stitch
Originally uploaded by helene83
Here's the first little bit of stitching finished last night. Its in DMC Cotton Perl #5 Ecru. The tunic is linen.

Tunic trim


tunic-tracing
Originally uploaded by helene83
Rachel and I sewed like crazy to get enough garb to stay clothed for all of Gulf Wars, but we planned to decorate stuff later. Now that I've got some time, I'm going to embroider the trim. This is my first victim - one of Rachel's tunics. I've picked a lily design off of a 13th century German painting.

Here is the first batch of tracing. I used a washable crayola marker to trace the design. My test swatches with the crayola markers washed clean, so hopefully it will work out ok.

Wednesday, February 24, 2010

Snow Day


Yesterday was a real snow day in Austin, Texas! As a result, I had the kiddo home and was lounging around with him doing some more stitching on the white work. Alas, now my spools are empty! Its very sad. I am completely out of my nice linen thread. I couldn't even get more, since we were snowed it (well, the Texas version of snowed in).

I fidgeted for a bit and then realized I had enough room on the frame for another piece. I recently took a black work class at Candlemas, so I (rather impulsively) pulled out my class packet and started a small blackwork bit.

The only thing is that I was trying to finish the white work so that I could put a larger piece on my frame for fun during Gulf Wars. Now I have another piece to finish before I can free up the frame. *sigh* I have sabotaged myself by adding another item on my to-do list. On top of that work is going to keep me pretty busy as well. The good news is that its a small piece and it seems to be moving rather quickly. I am going to have to do a run for more linen next time I head that direction for errands.

On the bright side, I had a fun day with the kiddo and got some stitching done when we were all romped out and lounging around. A good streak of stitching always makes me feel better about life, so its nice. I also learned that while the little boy doesn't mind cold at all, he considers snow a nuisance.

Thursday, November 5, 2009

BAM Tunic

I need another tunic, since I'll be camping at my next event (Bordermarch Autumn Melees), so I've started a brown and blue tunic. Its very much been worked on in 10 minute increments, but its finally hit a point where its starting to look like a tunic. Once I get things to a point where they are "lap" work, I usually make more progress, since I can pick them up and put them down easily depending on what's going on.

I've cut out the tunic parts and sewn on the borders and am now doing the decorative embroidery on the trim. Once I finish that, I'll piece it together. I joined SCA in part to learn more about embroidery - and its worked. I've really enjoyed the German brick stitch work and I took a gold work class a while back, but now I feel that I must try more things. So, this is my first attempt at some basic tunic embellishment with various embroidery stitches that I've been reading about online (and watching a few tutorial videos). I'm not going for anything fancy (just some buttonhole borders), since its a first attempt and I have a deadline. I'm happy with the progress and pleased with how much a little simple hand embroidery really jazzes things up.

The tunic is a soft linen/cotton blend and I'm embroidering with DMC linen thread. I folded things up so you could see the trim that I'm working on: