I made a girdle book to celebrate my friend Gaston's elevation to Laurel. I realized yesterday that I forgot to take pictures to post about it and this morning when I woke up, it turns out Gaston had done all my work for me by taking a picture and posting it to his blog :) My slacker ways have been rewarded.
Gaston's Post
He says some very nice thing (thanks!) and I encourage you to check out his blog as well. He does great work in armor, brewing, music, and general SCA puttering.
Sunday, June 5, 2011


Friday, June 3, 2011
St Martin's panel progress

I've uploaded some progress pictures of the St Martin's panel to Flickr. The above picture shows the current state of things. I've finished the color fill stitching and I'm working on the outlining.
The next thing that I have to think about is painting on the faces. Lady Sabine Berard has generously posted some pictures from the Cloisters at the NY Met. In them, she has a great close up of a painted face from a piece that came out of the same convent: picture. In this particular piece the face is done in "encroaching Gobelin stitch" and painted on, but on the St Martin's panel they just used a regular brick stitch as the foundation.

Unfortunately, I haven't read much on what kind of paint was used for the face. From scribe's guild I know that gouache paint is a good modern equivalent for scroll work, but I'm not sure for painting on embroidery. I'm still looking for sources though, so if anybody knows anything, I would be most grateful.
Sunday, May 15, 2011
Gloves: Goldwork progress pictures
Here are my pictures from the goldwork progress on the gloves I posted about earlier. The materials are a woven wool background with a muslin backing, wool felt for foundation padding, Kreinik Japan Gold #7, and Soie Crystal silk for couching.
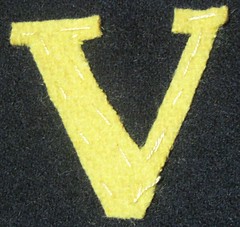
I used yellow wool felt for the foundation. Here is a progress of tacking it down.

The foundation is completely sewn down and I have started couching the gold thread.

More progress
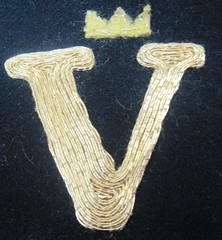
The "V" is finished and I have started the crown.

Finished embroidery for both gloves
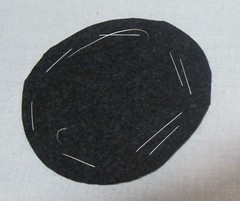
I used a dark gray wool foundation under the embroidery to give it a bit of lift off of the glove. Here are the circles basted on.
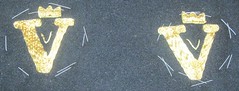
Front picture of basting.
After I based the circles down, I cut the fabric with a nice seam allowance and gathered it around the circles. I used a tiny drill bit to drill holes in the gloves and an awl to sew down the roundels. Next I made the gold braids out of the Krenick gold. Finally, Rachel and I sewed on the gold braid trim around the edges. Its at a slight angle to cover the depth difference between the glove bottom and the roundel top.
Overall this was a fun project. It was the first time I've used the foundation padding for more depth in the embroidery and it really does make it sparkle! Its a bit harder to work with and the precision/tightness of the couching was harder to get. Its hard to see in the picture but there is a bit of texture in the couching on the crowns that added a little sparkle. I liked the minimalist little "v" when I did the embroidery (especially in contrast to the depth of the big "V"), but now I'm kind of wishing that I had done something fancier. Ah well, that's life.
The Kreink Japan gold is fun to work with (and I have several large spools of it!) but I am looking forward to trying some of my real metal threads soon - just as soon as I can figure out the project!
I used yellow wool felt for the foundation. Here is a progress of tacking it down.
The foundation is completely sewn down and I have started couching the gold thread.
More progress
The "V" is finished and I have started the crown.
Finished embroidery for both gloves
I used a dark gray wool foundation under the embroidery to give it a bit of lift off of the glove. Here are the circles basted on.
Front picture of basting.
After I based the circles down, I cut the fabric with a nice seam allowance and gathered it around the circles. I used a tiny drill bit to drill holes in the gloves and an awl to sew down the roundels. Next I made the gold braids out of the Krenick gold. Finally, Rachel and I sewed on the gold braid trim around the edges. Its at a slight angle to cover the depth difference between the glove bottom and the roundel top.
Overall this was a fun project. It was the first time I've used the foundation padding for more depth in the embroidery and it really does make it sparkle! Its a bit harder to work with and the precision/tightness of the couching was harder to get. Its hard to see in the picture but there is a bit of texture in the couching on the crowns that added a little sparkle. I liked the minimalist little "v" when I did the embroidery (especially in contrast to the depth of the big "V"), but now I'm kind of wishing that I had done something fancier. Ah well, that's life.
The Kreink Japan gold is fun to work with (and I have several large spools of it!) but I am looking forward to trying some of my real metal threads soon - just as soon as I can figure out the project!
Friday, May 13, 2011
More Gloves!
I've been remiss in posting, but here is the current state of things. Pictures are included of the three gloves that I have completed for the crown. After I finished the stitching, Rachel came by and helped with the construction and finishing which speeded things along. I'll do some more posts that show construction updates, but I couldn't resist posting the finished gloves. The pictures don't really capture the shine of the silk or the sparkle on the gold (especially the highlights on the Queen's glove).
King's Gloves: These are padded goldwork on a woven wool foundation. I used wool felt for the padding to give it a bit of dimension.

Queen's Glove (Front)
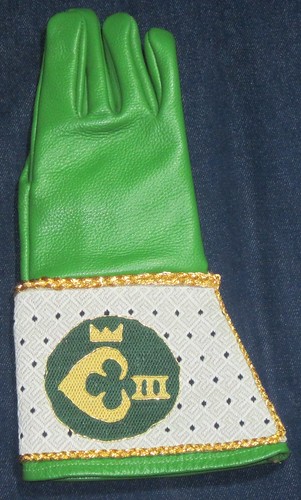
Queen's Glove (Back)

King's Gloves: These are padded goldwork on a woven wool foundation. I used wool felt for the padding to give it a bit of dimension.
Queen's Glove (Front)
Queen's Glove (Back)
Tuesday, March 1, 2011
Royal Gloves II
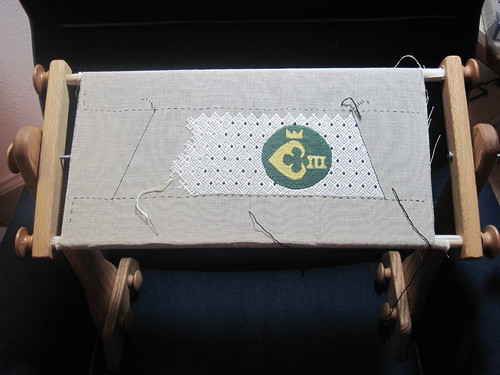
Here is my current progress on the second set of royal gloves. This pair is for the queen and has the same sigil as the first pair, but is in her colors. I added a background so that the whole cuff would be stitched. The background is an "E" pattern for Ebergardis and made to look like ermine (from her device). Rachel helped me put the background design together and pick out colors. The "E" motifs are in a very, very light gray and the lattice work is in white. Its always hard to imagine how repeating patterns are going to turn out, but I think we got a nice homage to ermine on this one.
Also featured in this picture is the lap stand that I got recently. I am really enjoying using it. The stand design really limits its usefulness to frames of a width pretty close to your lap width, but it has worked well for my current projects. I'm starting to ponder floor stands for some other work. I'm a bit torn between exploring modern frames and medieval frames. I'm not sure which I'm going to look at first.
Sunday, February 13, 2011
Finished Tunics
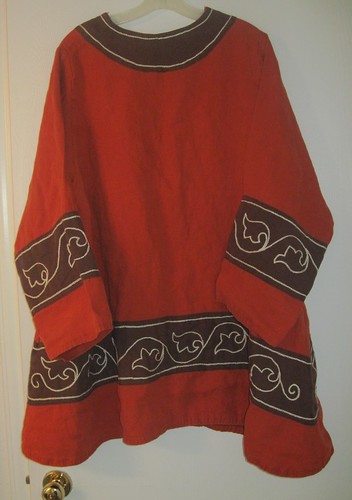
For those of you following the saga of Rachel's lily tunic - it is finally finished! Hooray! She came over and re-drew some of the detailing on the sleeve joins and the curly-q's at the end of the bottom panels better to her liking, and I finished it a couple of nights ago. I really like her improvements - I had her re-draw them because I didn't like my free hand work (its really not my strong suite). You can still see some of the extra markings since I haven't washed it yet.
Today I also have a Bonus Tunic! That's right - two tunics for the price of one post! My 2 1/2 year old son came with me to Kingdom Arts and Sciences and so I made him his own little tunic. Its about a size 4T, so its pretty small. My verdict on children's clothes is that they usually go faster and are a bit easier to sew, until you get to the neck and arms, which are tiny! I had to poke the eyelets in with an awl while I was in a hurry for the lacing to work, so I will try to stitch those up nicely before he wears it again. I meant to get a picture of him in it in action, but I totally forgot! Perhaps next time :)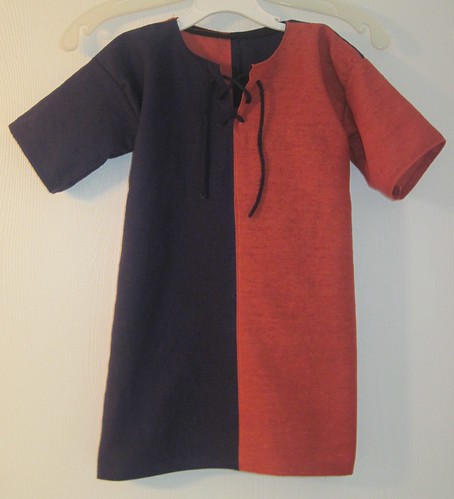
Monday, February 7, 2011
Gloves #1 are finished!
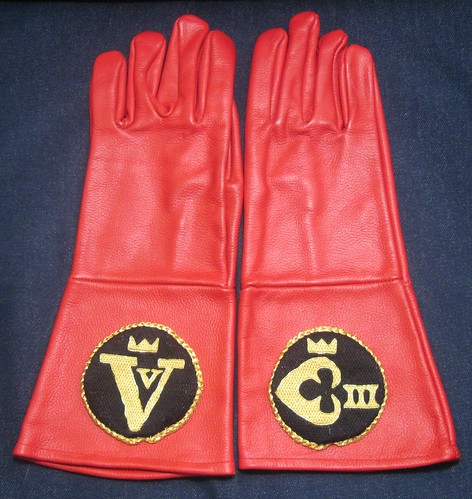
I have finished the first pair of royal gloves for Their Stellar Majesties Ulsted the Unsteady and Ebergardis von Zell. The stitching is done in German Brickwork and is Rainbow Gallery Splendor silk on linen, with Kreinik Japan Gold #7 couched as outlines. I sewed the stitched roundels onto the gloves using a leather awl and the trim is braided Kreinik Japan Gold #7. The gloves were delivered at Bryn Gwlad's Candlemas event.
Details:
Since I was attaching the stitched roundels to leather gloves, I rummaged through my toolbox and found my leather awl. It was definitely the right way to go, especially since the gloves were already put together and I had to reach inside them. The German brickwork stitching has a lot of body when finished, which makes for a really thick finished piece. Even with some tight stitching on the edges I found that I needed a thick trim to keep the edge from being too abrupt.
I tried several different approaches to the trim. I think that finger loop braiding can make really nice trim, so I tried a few different patterns and discovered that Japan gold is terrible for finger loop braiding. It doesn't hold tension well, stretches unevenly, and doesn't flex gracefully - so you end up with a chunky mess that glitters. I was going for something a bit more elegant than that so I tried several flat braids. The final winner was a three strand flat braid with 6 pieces of Japan gold per strand - 18 total strands. The result was a smooth trim which (with some fiddling) I got to lay at a (mostly) 45 degree angle to smooth the chunky edges.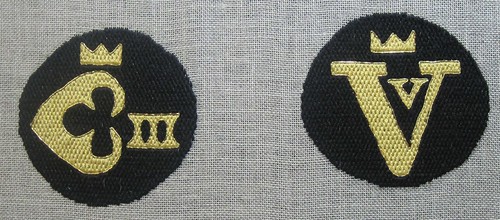
Subscribe to:
Posts (Atom)