Wednesday, June 4, 2014

Riveting news!

Test of decorative rivets

I've been looking for some pretty rivets since the planning stages of my armor upgrades.  I want something pretty, but don't have the budget for the super nice historical replicas.   These are my favorite thus far.  They are cheap and if you squint really hard, they look kind of rose or flower-ish.   The metal is a decent thickness, so they should hold up ok.  I think that they will look fairly nice.  I am almost at the riveting, so unless I find a better option before I finish drilling holes, these are it!

Thursday, May 29, 2014

Pouncing Armor!

Lining up the splints on my leg armor.   They have now been sized and ground smooth

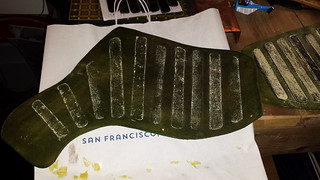
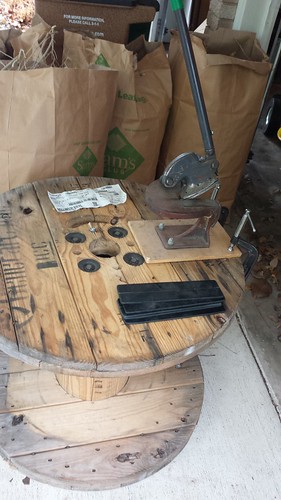
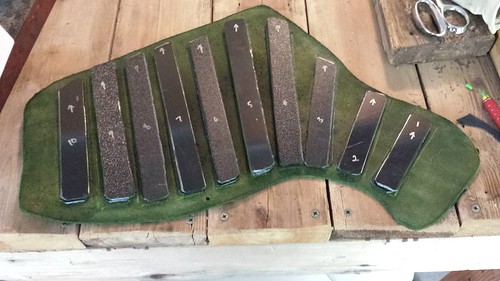
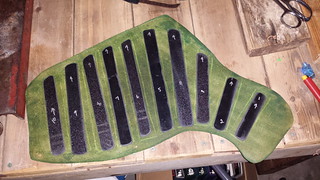
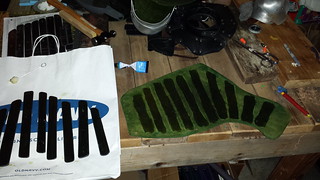
When we last left my leg armor, I was getting the splints together.  After cutting them out on the Beverly shears, I handed them off to Master Jovian.  He was kind enough to grind the edges smooth for me.  Above you can see the now not-jagged splints ready to go.

Contact cement to hold things together while I do the riveting

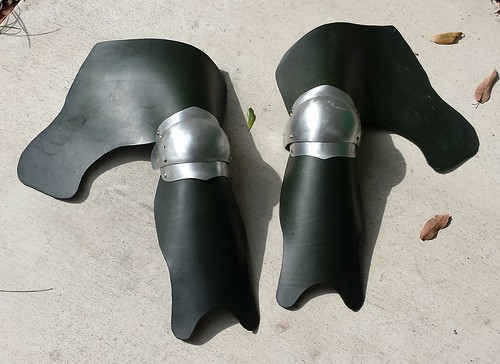
I hate getting rivet holes to line up and dealing with plastic and leather shifting about, so I have decided to eliminate the problem with copius amounts of contact cement.  The contact cement probably wouldn't survive fighter practice, but it will hold things together long enough for me to drill and rivet with minimal fuss.  Here is my sticky, gooey progress.

All glued together!

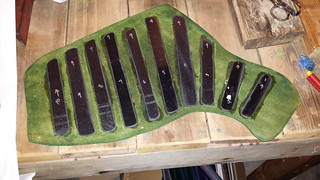
Once the contact cement cured, I placed all the splints in their proper position.  This felt a bit like a surgical procedure, since one false move and the plate is stuck forever.  Well, probably not forever, but there is no wiggle room with dropping the plates.  Contact cement does it's job well and the one splint that I tried to re-position would not budge even the slightest.

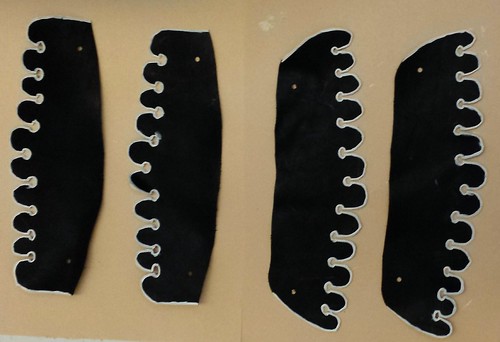
Some of my projects have extensive plans that go into great details.  Many have "the magic happens here" steps that lead to creativity, innovation, and occasionally weeping.  For some reason, my magic step here was "do the other leg".  Since I had done all the plate positioning directly on the first leg I didn't really have a pattern to work with.  What to do?  The answer was prick and pounce - armor style!

Sidewalk chalk for copying pattern

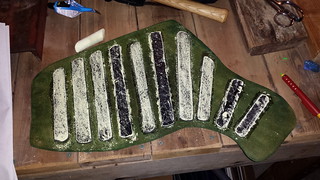
I borrowed my son's sidewalk chalk and used it to make maximum mess on the splint plates.  The plates with the texture side up did a much better job of being chalky, but the smooth plates did adequate.  When all the splints were thoroughly dusted, I carefully lined up the two pieces, flipped them over, pressed down carefully (no shifting!), and then removed the chalked piece.

Copying success!

The result was a magnificent success!  I was hoping for it to work well enough for a fiddly approximation, but the copy was perfect!  After the surprisingly effective pattern transfer gluing the second leg was a breeze.  

Thursday, May 22, 2014

Acts of random dye-ness

{Wool, nice spun silk, cheap silk} dyed with red cabbage

 I was making myself a nice cabbage dish the other day and couldn't bring myself to throw out the pot of bright purple water.  So, instead I added some thread.   Perfectly logical.  Anyway, here's the results of the test run.  Above is are the three samples {wool, nice spun silk, cheap silk} dyed with purple cabbage using a cream of tartar mordant and a bit of vinegar on the rinse.  I like that all three of the pinks come from the same batch.  The cheap silk made the brightest pink.  Also, since purple cabbage makes a nice litmus test (literally) you can see the clothespins with their nice basic wood (pink) and apparently something acidic going on with the metal (green).  You can use your excess cabbage to make litmus strips and test all the things for fun!  Science! Yay!

I liked the result and then got to thinging "Now what am I going to do with this?"  Obviously I needed another color, so I found another skein of the cheap silk and let it stew in the left-over coffee from yesterday.  After drying I got a really nice yellow out of it.  So there you have it - random project complete.  I'm really not sure what I'm going to do with it yet.  The colors on these threads will be more delicate, so I won't make anything that must be washed frequently or with gusto.

Dyed another skein of the cheap silk.  I used left over coffe :)

Tuesday, April 8, 2014

Leg armor progress

Legs are partially assembled

I've resumed work on upgrading my armor, starting with the legs that I was working on. The pieces had been previously cut and dyed, and then laid on a shelf where they weren't doing much of anything. So, this weekend I decided to make some progress. I punched rivet holes and gave them a nice coat of neatsfoot oil. The oil darkened the green dye a bit, but greatly improved the handling and feel of the leather. In the picture above you can see the legs partially assembled with the knee cops.

beverly shears and kydex

I borrowed some beverly shears from a friend of mine and got to work cutting out plates for splinting the thighs. I've mounted the shears using some C-clamps onto a wooden spool that I picked up for $5 from the electric company. The spool is heavy enough to be sturdy, small enough to fit in the back of my micro van, and the round shape makes it relatively easy to move around. This setup worked really well and I got all the plates for the thighs cut out.

Thigh armor splints cut out

And here is what two sets of thigh splints look like after they are pattern drafted, cut, and laid out. I still need to grind the edges, since they are a bit rough in places.

Dagging edges are painted

What armor kit would be complete with out some fashionable bling? Ok, it's 14th century fashion, but still - fashionable. I pulled out some thinner black leather and cut dagging strips for my knee cops. The black helped contrast against the green, making it appear less dark. I decided that the contrast needed a bit more zing, so I painted a white border around the edges of the dagging. It looks even nicer than I imagined! As an added benefit the paint sealed the leather on the edges and made the dagging cuts look more tidy.

Sunday, March 23, 2014

Giant Sparkly Banner on Tour

KingdomAnS-109

KingdomAnS-110

Giant Sparkly Banner made a trip to Kingdom A&S and to Bryn Gwlad A&S competitions. Above are pictures of it in action. Below is a picture of the banner completed getting ready to go traveling.

banner

My display used two trays: one for materials and one for technique. The materials tray contained my tools including scissors, needles (in the needlebook), and a laying tool. I made skeins with the threads I used in the green, the passing gold, and the gold twist. Finally, I included a sample of the gold twist lucet cord, which I stored on a thread winder.

tray 2

The second tray displayed the various steps for the embroidery. The two fill patters were embroidered in a series of steps

  1. Foundation: The foundation layer is the white interface foundation which was cut to design and ironed on the brocade. In the sample the white layer is shown at either end of the swatch.
  2. Laid green stitching: The green threads were laid down for full coverage of the foundation. The stitch length for the green thread is much longer than most embroidery stitches because it will be couched down later. You can see in the picture that the green thread drifts and wiggles where there are no layers above it.
  3. Laid gold stitching: The next layer was gold passing thread embroidered in laid work pattern, which was on top of the green embroidery. The letters were embroidered in open laid work using a grid pattern. The leaves of the wreath was patterned after Gabriel's wings from an alter frontal so the only laid work was the single gold twist thread along the center. The top half of the sample shows the laid gold threads before they are couched. There is still some shifting of the gold and green threads and the sheen is at a uniform angle.
  4. Couching:After the laid work is finished, the gold pattern (grid or wing/leaf) was couched down. For the grid pattern on the letters, each intersection is couched with a single stitch of gold passing thread. For the wing pattern on the leaves of the wreath, the center gold twist is couched with a longer stitch at an acute angle. The leaves have fewer couching stitches, but the stitches are longer and cover more of the green thread. The bottom half of the stitching in the sample shows the grid with the intersection couched down. The couched intersection gives the work a more dimensional look which adds more sparkle. On the far right end of the swatch you can see the grid couched down without the green layer, to show the couching stitches more clearly.
  5. Outline: The final step for each embroidered motif was to add an outline of couched gold twist. The sample shows the gold twist couched on the bottom of the foundation layer. On the right side of the swatch, the end of the twist has been plunged (pulled through the brocade) as is normally done on finished embroidery. This is a good example of why the foundation and brocade combination work so well. The foundation provides stability for the couching stitches, which the looser weave of the brocade allows the much thicker gold twist to be pulled through to the back without creating tears or runs in the weave. The left side of the swatch shows the gold twist left loose on the top, which is what it looks like while it is being couched. You can immediately see that the biggest challenge here is holding the thread in place for stitching, while trying to keep the twist and prevent fraying of the top threads.

tray 1

Wednesday, March 19, 2014

Long arm cross stitch

long arm cross stitch

I've been doing a lot of playing around lately with different threads and techniques, and having a lot of fun with it. This is my test swatch for both a thread and technique. I've never done long arm cross stitch before, so I thought I'd give it a try. It is a little different rhythm than regular cross stitch, but the stitching itself is very similar. The result is a thicker stitch cover of the fabric that was used for all sorts of things in medieval times. The pattern is from a Dover Design book.

The threads that I used were Gütermann top stitch threads. This thread is made for decorative top stitching with sewing machines, but it's much thicker than normal sewing thread and I was curious. Overall, I was surprised that I love it! It's easy to handle, the cotton is very nice, and I don't have to deal with multiple plies. I feel a little silly to admit it, but I also really, really like that it's on a spool so I don't have to fiddle with it. Not only do I really like stitching with it, but the thread is also made for sewing machine work - so it's color safe and washable! Hooray! I think it's the perfect candidate for some heavy fighting garb.

Thursday, March 13, 2014

Lucet cord edging

I finished the Giant Sparkly Banner a while back, but still need to finish posting progress pictures. Here's a short summary of how I finished the edges using lucet cord. First I prepared the seam by turning in the edges, pinning them, and ironing them flat. Here is a picture of the stitching in progress so that you can see the front layer (the yellow brocade), the back layer (the blue linen), and the gold lucet cord.

Use the first stitch to pick of both pieces of fabric along the folded edges.

The second stitch then goes throughout the middle of the lucet cord. When you pull tight it will close the seam with the cord on top.

I stitched the edges closed with my gold Gutterman thread and they edges look very nice. It's a very simple medieval period technique to decorate edge seams.

Above is an example of a pouch with braids along for seam finishing. The braids on this one look like finger loop braiding. Dutch circa 1617/1622

Above is another good example - Dutch?/Italian? cir cal 1580+